
")
Email has segued into 2026 with smarter inboxes, predictive AI, and a renewed focus on trust. But personalization? That part stopped being innovative years ago. It’s table stakes now. And brands that still treat it like a “nice to have” are already falling behind.
Mailjet puts it like this in its Email Marketing Trends to Watch for 2026: if your stack can’t support behavioral segmentation, dynamic content, or AI-assisted optimization, you’re at a disadvantage.
HubSpot’s own data reiterates the same point. Nearly 67% of respondents believe subscribers will expect far deeper personalization by 2030—and companies that don’t personalize based on subscriber demographics consistently report lower revenue.
The takeaway is: while subscribers don’t want you to read their minds. But they do want your emails to treat them like rows in a database. And if your emails do that, they will switch to brands that treat them like individuals.
This is why dynamic content is so important.
When personalization responds to behavior and context across the buyer’s journey, based on who the user is, and how they engage, it ceases being cosmetic and starts turning customers into long-term advocates.
HubSpot email personalization is meant for exactly this. It lets you think beyond static blasts and create emails that change in real time for each contact. From basic personalization tokens to conditional logic and dynamic email templates, HubSpot gives you more flexibility than most teams actually use.
And that’s the gap this blog closes.
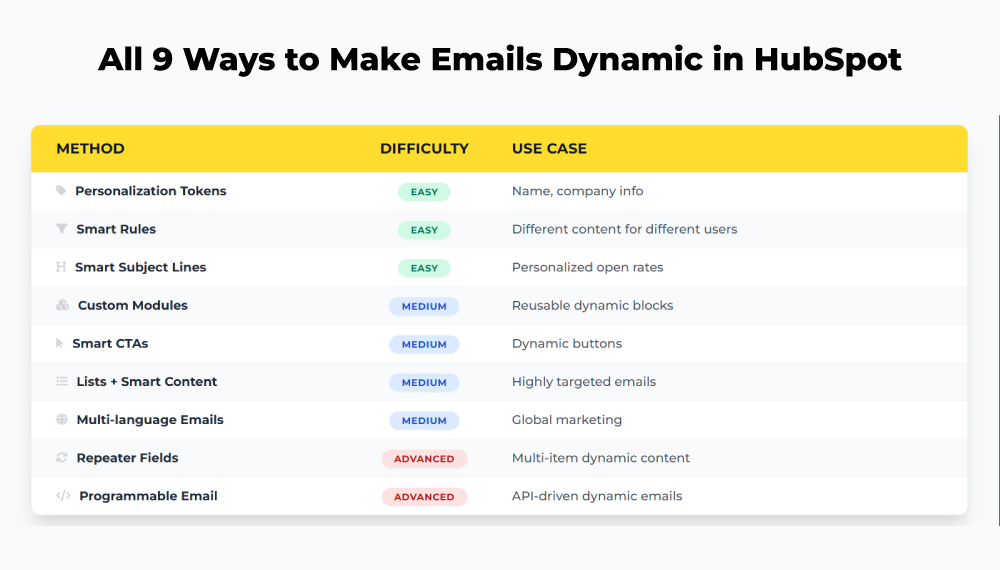
There are multiple ways to add HubSpot dynamic email content—but most guides only scratch the surface or repeat the same two tactics. This isn’t one of those. Here, you’ll learn all the methods for creating dynamic, personalized email templates in HubSpot, step by step. So that when you choose the approach, it’s the right one, not just the easiest one.
How to Personalize Emails in Hubspot
You personalize emails in HubSpot by using contact and company data to dynamically change what each recipient sees—across subject lines, body content, CTAs, images, and even entire sections of an email.
HubSpot email personalization achieves this through:
- Personalization tokens
- Smart rules (conditional content)
- Dynamic email modules
- Repeater fields
- HubSpot lists + Smart rules
- Multi-language dynamic emails
- Dynamic CTAs
- External CRM data
- Smart subject lines + Smart preview text
The scope of HubSpot email personalization is broader, from lightweight or deeply dynamic. You can insert a contact’s first name or company into an email at the basic level. At the advanced end, it can mean dynamically rendering different products, offers, or content blocks in dynamic email templates in HubSpot, without creating multiple campaigns.
Each method controls who sees what, based on CRM properties, behavior, lifecycle stage, language, or list membership.
1. Personalization Tokens
Personalization tokens are the most direct way to implement HubSpot email personalization. They act as placeholders that automatically pull specific values from your CRM fields into the email body or subject line.
Tokens let you address a contact by name. But in no way they’re limited to surface-level fields. High-performing segmented email campaigns in HubSpot leverage deeper CRM properties:
- Contact first name
- Company name
- Industry
- Recent engagement date
- Custom contact or company properties
You’ll see tokens written in this format inside the editor:
Hi {{ contact.first_name }},
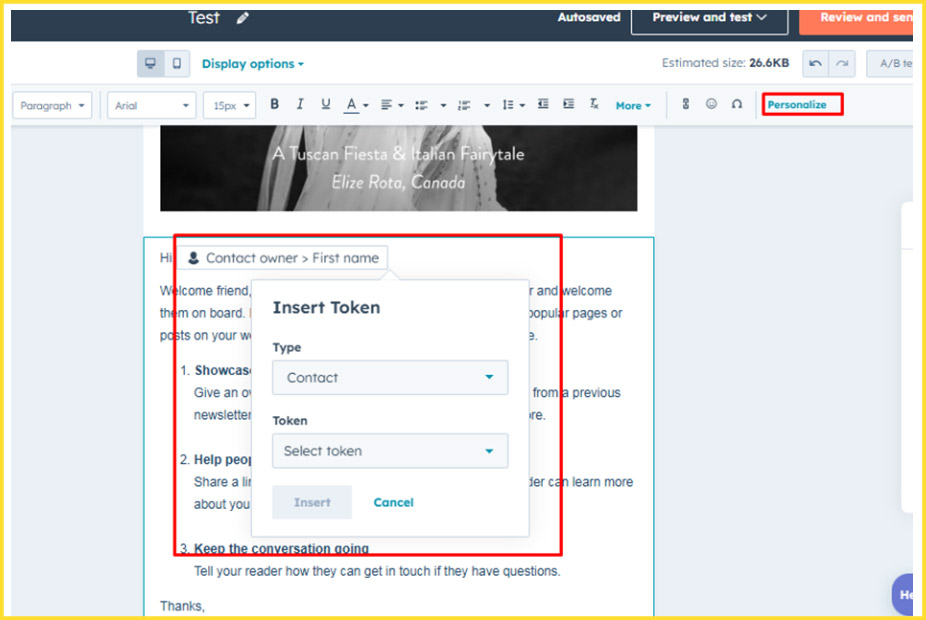
When the email sends, HubSpot replaces the token with the actual value stored in the contact record.
Where personalization tokens work
Personalization tokens can be used across almost every visible part of an email:
- Subject line
- Preheader text
- Body copy
- CTAs
How to add personalization tokens in HubSpot
Adding tokens is a built-in feature of the email editor:
- Go to Marketing → Email in your HubSpot account
- Open or create an email
- Click into a rich text module
- Select Personalize from the toolbar
- Choose the token type:
- Contact property
- Company property
- Deal property
- Ticket property
- Select the specific property you want to insert
- Set a fallback (default) value
- Click Insert
- Contact list membership
- Lifecycle stage
- Country
- Preferred language
- Device type
- Query parameters
- A lead sees: “20% off on your first purchase”
- A customer sees: “Welcome back—your reward points are waiting”
- Subject lines
- Text modules
- Images
- Buttons and CTAs
- Rich text blocks
- Entire sections of an email
- Go to Marketing → Email
- Open an existing email or create a new one
- Navigate to the Settings tab
- In the Subject line section, click Add smart rule
- Define the rule based on your chosen criteria
- Go to Marketing → Email
- Hover over the module you want to personalize
- Click the More dropdown, then select Add smart rule
- In the dialog box, choose how content should change:
- Contact list membership
- Lifecycle stage
- Select the lists or stages you want to target
- Click Create
- For Modules: Use the “View as a specific contact” feature in the editor. The module will automatically update to show the version that applies to that specific record.
- For Subject Lines: The only way to verify a smart subject line is to send a test email to yourself or a colleague who meets the specific smart rule criteria.
- Text fields
- Boolean (true/false) fields
- Select dropdowns
- URLs
- Images
- Color pickers
- CTA pickers
- Go to Content → Design Manager
- Click File → New file
- Select Module from the “What would you like to build today?” dropdown
- Choose where the module will be used (Emails, Blogs, Landing pages)
- Select the module content scope:
- Local module (changes affect only one instance)
- Global module (changes update every email using it)
- Name the module and choose its file location
- Click Create
- Multiple products
- Multiple articles or blog links
- Testimonials
- Image galleries
- Offers or promotions
- Event agendas or schedules
- You start by creating active lists that define your audience segments. These lists can be based on industry, lifecycle stage, recent behavior (like cart abandonment), engagement level, or any other CRM-backed criteria.
- Once set up, these lists update automatically as contacts change.
- Next, move into the email editor. You apply Smart Rules to the parts of the email that should change. Such as text blocks, images, CTAs, or subject lines.
- For each Smart Rule, you select list membership (or another supported criterion like lifecycle stage or country) and define a content version for each segment.
- List A: Cart Abandoners
- List B: Recent Purchasers
- List C: Inactive Users (30 days)
- Cart abandoners see a discount or reminder
- Recent purchasers see an upsell or cross-sell
- Inactive users see a reactivation offer
- English content for English-speaking contacts
- Hindi content for Hindi-speaking contacts
- French, Spanish, or other supported languages
- Matching subscription links and default module content
- Go to Marketing → Email
- Open an existing draft or create a new email
- Click the Setup icon in the left sidebar
- In the Template section, select a language from the Language dropdown
- Default content inside HubSpot modules
- Subscription links
- The translated subscription type used in the email
- Navigate to Marketing → Email
- Hover over the email and click Actions → Generate translated version
- Select the target language
- Name the translated variation
- Click Generate
- You’re running global or regional campaigns
- Language preference is stored reliably in the CRM
- You want consistent structure, but localized content
- Visitor or contact behavior
- Lifecycle stage
- List membership
- Device type
- Go to Marketing → CTAs
- Create a new CTA, or open an existing one
- Choose Create smart version or add Smart Rules
- Define targeting rules using:
- Lifecycle stage
- List membership
- Contact properties
- Device type
- Customize the CTA copy, design, and destination for each rule
- Set a default CTA for contacts who don’t match any rule
- Insert the Smart CTA into your email
- Dynamic product recommendations
- Step-by-step onboarding flows that change as users progress
- Personalized user dashboards rendered inside emails
- Billing reminders with live account data
- Go to Content → Design Manager
- Select File → New file
- Choose Module and click Next
- Select Emails as the content type
- Name the module and click Create
- In the module settings, toggle Use module for programmable email on
- Go to Content → Design Manager
- Select File → New file
- Choose HTML + HubL and click Next
- Set the template type to Email
- Name the template and click Create
- At the top of the template, add the following flag inside the comment block:
isEnabledForEmailV3Rendering: true - Finish editing and click Publish changes
The most common caveat in how to personalize emails in HubSpot is failing to account for missing data. If a contact record is incomplete, the token will appear blank, often resulting in awkward punctuation (e.g., “Hi ,”). To prevent this, you must set a Fallback Value. If the “First Name” property is empty, your fallback might be “there” or “friend.”
Pro-Tip: For a token to populate, the recipient must be a tracked visitor with an existing record in your CRM. If the data doesn’t exist, HubSpot defaults to your specified fallback immediately upon sending.
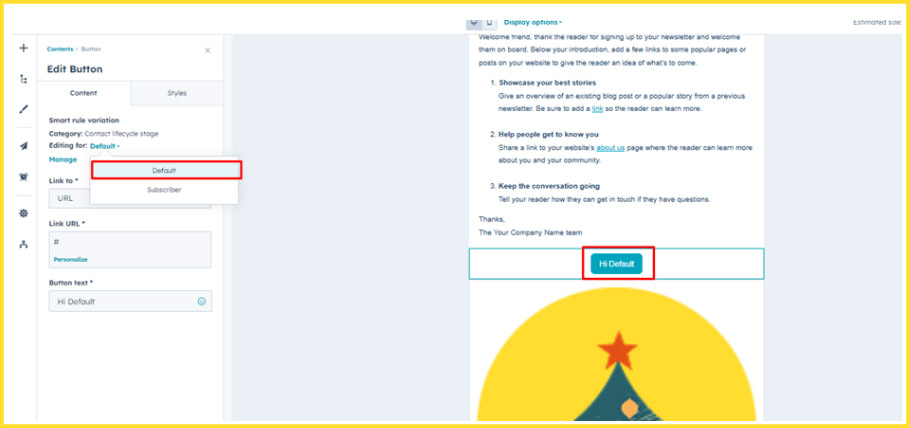
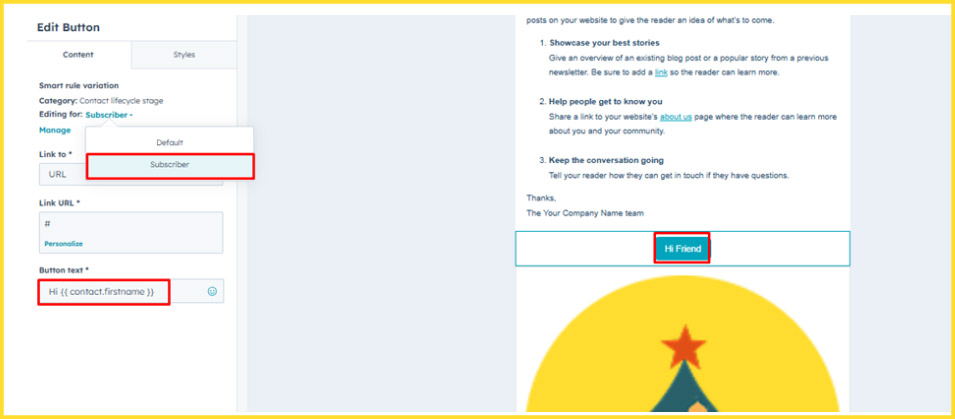
2. Smart Rules (Smart Content)
With Smart Rules, a single email can display different content to different audiences. Rather than inserting data into a fixed message, you change the message (read intent and context) itself. You build one master template that morphs based on the recipient’s relationship with your brand based on:
Example:
Where Smart Rules can be used
Smart Rules aren’t limited to body copy. You can apply them to:
That makes them one of the most flexible tools for segmented email campaigns in HubSpot.
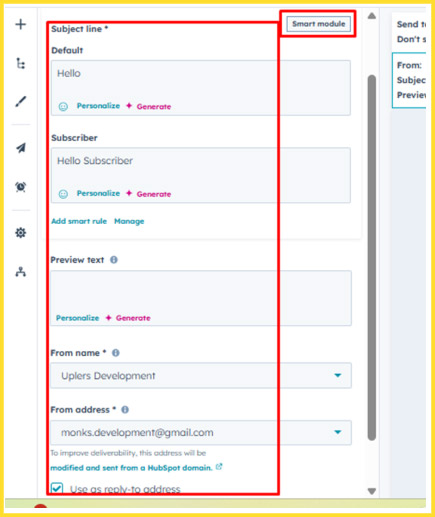
Adding a smart subject line
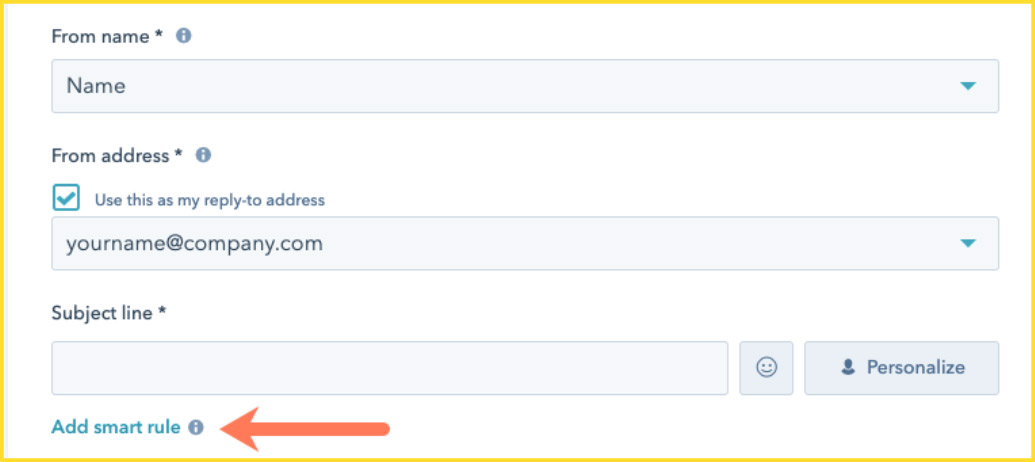
Image Source: Hubspot
To personalize the subject line using Smart Rules:
Adding Smart Rules to a module
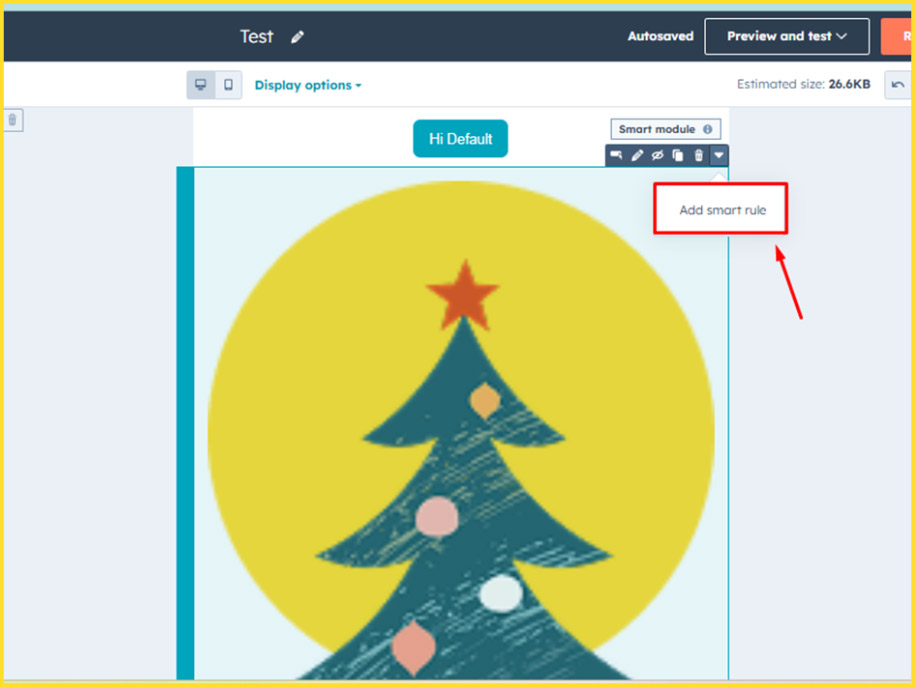
You can also apply Smart Rules directly to content modules:
Testing and Validation
Because smart content is invisible in a generic preview, you must validate your rules before hitting send. Testing should have:
Dig deep:
Smart Personalization: How to Personalize Your Emails with HubSpot Smart Content
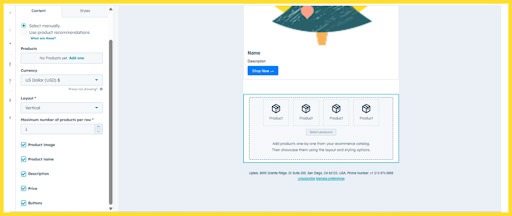
3. Dynamic Email Modules (Design Manager)
This is the “advanced” HubSpot email personalization, typically managed by developers or email specialists who need to build high-performance dynamic email templates in HubSpot beyond the limitations of the standard drag-and-drop editor.
Using the Design Manager, you can build custom email modules that change dynamically based on structured inputs. By building a module once, you create a flexible component that marketers can use across any email.
What you can build into a custom module
Creating a custom email module in HubSpot
4. Repeater Fields (Advanced Dynamic Content)
The repeater field is the engine of high-volume HubSpot dynamic email content. Repeater fields are the most powerful dynamic capability available to create high-volume HubSpot dynamic email content. They don’t just change content, they multiply it.
A repeater allows one module to display any number of items using structured data. You design the layout once, and HubSpot automatically repeats it for each product, article, or offer.
With repeaters, you can render:
Repeaters are implemented inside custom email modules and rely on HubL to loop through items. The HTML is written once, and HubSpot handles the iteration.
The logic looks like this:
{% for item in module.items %}
<h3>{{ item.title }}</h3>
{% endfor %}

5. HubSpot Lists + Smart Rules (Dynamic Audience Segmentation)
To personalize HubSpot emails using Lists and Smart Rules:
For example:
Inside the same email template:
Managing three separate emails for these segments creates technical debt: three subject lines to test, three sets of links to verify, and three reports to aggregate. By nesting these rules within a single master template, you ensure brand consistency while delivering high-context relevance.
6. Multi-language Dynamic Emails
For global brands, personalization in HubSpot emails is as much about linguistic accessibility as it is about data. HubSpot’s multi-language functionality allows you to solve this by creating a localized language experience.
HubSpot supports multi-language dynamic emails thanks to its smart content and language settings. It means you can automatically show the right language version based on a contact’s preferred language property—served without manual segmentation.
When language is set correctly, language-based personalization in HubSpot can dynamically display:
Setting the email language
To get HubSpot serve the correct default content and subscription links:
With this setting, you can control:
Creating translated versions of an email
For fully translated emails, HubSpot lets you generate language variations:
Once your primary version is ready, you don’t need to rebuild emails from the ground up. Instead, you create a mirrored variation using the Generate Translated Version tool to create a mirrored variation.
When to use multi-language dynamic emails
7. Dynamic CTAs (Smart CTA)
If your email body is personalized perfectly to the T, but your CTA is a generic “Click Here,” you are faltering at the most critical point of the user journey.
HubSpot Dynamic CTAs or Smart CTAs apply the same idea as dynamic content, but to the most action-oriented part of your email. Smart CTAs adapt based on who someone is and how they interact with your brand. The email stays the same. The call-to-action changes.
What Smart CTAs can adapt to
Instead of sending five separate emails to five different segments, you can deploy a single campaign where the conversion point shifts dynamically.
For instance, for a contact who has already downloaded multiple whitepapers, a “Download Guide” CTA is a waste. A Smart CTA can recognize their high engagement and swap that button for “Book a Product Demo.”
How to create and use Smart CTAs in emails
To set up a dynamic CTA in HubSpot:
Here’s a HubSpot’s guide on How You Can Use Dynamic, Personalized CTAs in Your Marketing
8. Smart Subject Lines + Smart Preview Text
Even the subject line can be dynamic using personalization tokens.
Example:
{{ contact.first_name }}, your exclusive offer is inside!
9. External CRM Data (Programmable Email)
Programmable emails let you use serverless functions and JSON payloads to dynamically construct email content at send time. With external data and advanced HubL syntax, you can build emails that reflect a user’s current state, not just their profile.
Common use cases for programmable emails are:
Programmable emails work through custom modules or coded email templates built in the Design Manager. Once configured, these modules can be used inside the standard HubSpot drag-and-drop email editor.
Creating a programmable email module
This is the most flexible approach because it allows developers to build the logic once and then let marketers drag and drop that module into the standard email editor.
For emails that require a completely bespoke structure, you can build a full HTML/HubL template.
Wrapping Up
HubSpot email personalization is intuitive to use, and harnessing it effectively brings up a slew of possibilities to deliver super personalized experiences to your subscribers.
But that doesn’t mean it’s simple to execute well.
Knowing what’s possible in HubSpot is very different from choosing the right method, building it cleanly, and maintaining it while campaigns, lists, and priorities keep shifting.
Dynamic email templates demand structure, consistency, and testing. Even more so, when personalization starts affecting layout, logic, and deliverability.
If you need help designing and building professional HubSpot email templates that are dynamic by default, our team can take that off your plate. We handle the execution to spec, so you can focus on the strategic work that moves the business forward.Worth exploring?
If yes, let’s get started.